I'm so excited about my nails, I love these colours together! I'm wearing OPI's Dim Sum Plum and on my accent nails I've got OPI Fly from the Nikki Minaj Collection with Milani Jewel FX Gems!
What do you think? Do you love it as much as I do? Let me know what you think : ) xx
Saturday, March 31, 2012
March Favourite Beauty Products!
As it's the end of March already (this year is going way too fast) I thought I'd do a March Favourites as there have been a few products that I've been really loving this month.
My first favourite for this month is Batiste Dry Shampoo in the scent Wild, I love dry shampoo as I only wash my hair once a week due to it being highlighted and quite dry but I have a side fringe which gets quite greasy as my skin is really oily so if I use dry shampoo on my fringe a couple of times a week I can get away with just washing my hair once a week. I've only ever tried the Batiste brand of dry shampoo so I can't say it's better than any other brand but it works for me and I love the scent of the Wild one which I actually only bought because it was leopard print and I love leopard print. Can anyone else recommend a better dry shampoo?
I got mine from Boots for £2.99 and I know at the moment Boots have got a 3 for 2 on all hair, skincare and makeup products.
Next up is Alberto Balsam Intensive Conditioning Treatment which is a deep conditioning treatment for dry and damaged hair.
This product claims to "smooth rough cuticles and restore softness, manageability and shine" and I would say it definately does all of that. You only need to leave it on for 1-3 minutes, I usually leave it on for as long as it takes to comb my hair through which takes ages as my hair is really thick and quite long so it tangles a lot! I use this every time I wash my hair as my regular conditioner and it leaves my hair feeling really soft, shiny and more healthy looking but the best thing about this product is the price, I got mine from Asda and they'd got them for 80p or 4 for £3.00 which makes them 75p each!! How good is that?! So if you like the sound of this get down to your local Asda now and stock up!
I got this next product because of all this lovely weather that we've been having which now appears to have gone away :(
Garnier Summer Body Moisturising Lotion Sun-Kissed Look, it's a body lotion with a gradual tan and it gives a really good colour! I've found that using it three days in a row to build up a decent tan and then using it every other day keeps me looking nicely bronzed without the massive up keep of applying fake tan. The only thing I don't like about it is the smell the next day, when you first apply it (I put it on at night) it smells really nice, like apricots but all day the next day it reeks of fake tan (if you use fake tan then you know the smell I mean). It was £4.49 I think from Asda but you can get this from Boots, Superdrug and probably most other supermarkets. I think the price is pretty reasonable to say I'm getting not far off the same results as using fake tan but without the hefty price tag and the massive up keep.
My next favourite is my Origins Vitazing SPF 15 Energy boosting moisturiser, this is an amazing product, it comes out of the tube looking like a normal moisturiser, just a white cream, but when you rub it into your skin it changes to a tinted moisturiser and it gives a small amount of coverage to your skin and leaves you looking really fresh faced with a healthy glow, I love it! It's just rich enough for me as I have oily skin so if your skin is dry I'm not sure this would work for you but it matches any skin tone and just leaves your skin looking so good, it's also a great base for makeup, I just put this on with some concealer and loose powder and my skin looks great without any foundation.
The only down side for me with this product is the price, it's £26 for 50ml which is quite expensive for me but a little bit goes a long way and I really love it so I'm happy to pay that much for now unless I find something better.
Right now for the makeup! First up is L'Oreal Volume Million Lashes in Extra Black, this is the best mascara I have EVER used! I absolutely love it! I've always been a big fan of Maybelline Great Lash mascara but I never used it and looked at my lashes and thought WOW so I was always on the lookout for something else, I've tried a few other mascaras but never liked them and always went back to Great Lash until I found this beauty and I'm never going back!
It gives amazing volume to your lashes with just the right amount of clump without being clumpy (if that makes any sense) It doesn't flake off during the day and isn't really hard to remove with a face wipe. I have nothing bad to say about this mascara because I absolutely love it and would recommend it to everyone.
Next is Collection 2000 Shimmer Shades in the shade Blushalicious, this is a blusher with four shades, a bright pink, a darker more plummy pink, a peach and a pale pink.
I love this because it's big enough to use each colour separately or swirled together if you wish and all four colours are gorgeous, I especially love the bright pink and the peach. I've used this blusher loads and for £4.99 I think it's brilliant value.
If you saw my last Makeup Haul! post then you'll know that I bought the Maybelline Eyestudio Lasting Drama Gel Eyeliner 24 Hour in Black, it took me a couple of weeks to try this product as quite frankly I was scared to use it, I'm rubbish with liquid liner and I thought this was going to be something that would require tons of practise to get right but I couldn't have been more wrong! It's so easy to apply, the brush that comes with it is perfect for applying it and I absolutely love the way it looks!
It dries to an almost matte black and does not budge once dry which only takes a minute although it's easy to remove, I'm a total gel liner convert and I can safely say I'll never go back to pencil eyeliner again! It was £7.99 which I think is quite good as I can imagine this will last me for ages and you get the brush with it aswell. Love it, love it, love it!!
Last but not least is my Urban Decay Naked palette which I've used pretty much everyday since I got it. For a full review on this product click here. Everyone should own one of these!
I hope this post wasn't too long but I just had so many favourites this month I had to include them all. Has anyone else tried any of these products? What did you think about them? Leave me a comment :) xx
My first favourite for this month is Batiste Dry Shampoo in the scent Wild, I love dry shampoo as I only wash my hair once a week due to it being highlighted and quite dry but I have a side fringe which gets quite greasy as my skin is really oily so if I use dry shampoo on my fringe a couple of times a week I can get away with just washing my hair once a week. I've only ever tried the Batiste brand of dry shampoo so I can't say it's better than any other brand but it works for me and I love the scent of the Wild one which I actually only bought because it was leopard print and I love leopard print. Can anyone else recommend a better dry shampoo?
I got mine from Boots for £2.99 and I know at the moment Boots have got a 3 for 2 on all hair, skincare and makeup products.
Next up is Alberto Balsam Intensive Conditioning Treatment which is a deep conditioning treatment for dry and damaged hair.
This product claims to "smooth rough cuticles and restore softness, manageability and shine" and I would say it definately does all of that. You only need to leave it on for 1-3 minutes, I usually leave it on for as long as it takes to comb my hair through which takes ages as my hair is really thick and quite long so it tangles a lot! I use this every time I wash my hair as my regular conditioner and it leaves my hair feeling really soft, shiny and more healthy looking but the best thing about this product is the price, I got mine from Asda and they'd got them for 80p or 4 for £3.00 which makes them 75p each!! How good is that?! So if you like the sound of this get down to your local Asda now and stock up!
I got this next product because of all this lovely weather that we've been having which now appears to have gone away :(
Garnier Summer Body Moisturising Lotion Sun-Kissed Look, it's a body lotion with a gradual tan and it gives a really good colour! I've found that using it three days in a row to build up a decent tan and then using it every other day keeps me looking nicely bronzed without the massive up keep of applying fake tan. The only thing I don't like about it is the smell the next day, when you first apply it (I put it on at night) it smells really nice, like apricots but all day the next day it reeks of fake tan (if you use fake tan then you know the smell I mean). It was £4.49 I think from Asda but you can get this from Boots, Superdrug and probably most other supermarkets. I think the price is pretty reasonable to say I'm getting not far off the same results as using fake tan but without the hefty price tag and the massive up keep.
My next favourite is my Origins Vitazing SPF 15 Energy boosting moisturiser, this is an amazing product, it comes out of the tube looking like a normal moisturiser, just a white cream, but when you rub it into your skin it changes to a tinted moisturiser and it gives a small amount of coverage to your skin and leaves you looking really fresh faced with a healthy glow, I love it! It's just rich enough for me as I have oily skin so if your skin is dry I'm not sure this would work for you but it matches any skin tone and just leaves your skin looking so good, it's also a great base for makeup, I just put this on with some concealer and loose powder and my skin looks great without any foundation.
The only down side for me with this product is the price, it's £26 for 50ml which is quite expensive for me but a little bit goes a long way and I really love it so I'm happy to pay that much for now unless I find something better.
Right now for the makeup! First up is L'Oreal Volume Million Lashes in Extra Black, this is the best mascara I have EVER used! I absolutely love it! I've always been a big fan of Maybelline Great Lash mascara but I never used it and looked at my lashes and thought WOW so I was always on the lookout for something else, I've tried a few other mascaras but never liked them and always went back to Great Lash until I found this beauty and I'm never going back!
It gives amazing volume to your lashes with just the right amount of clump without being clumpy (if that makes any sense) It doesn't flake off during the day and isn't really hard to remove with a face wipe. I have nothing bad to say about this mascara because I absolutely love it and would recommend it to everyone.
Next is Collection 2000 Shimmer Shades in the shade Blushalicious, this is a blusher with four shades, a bright pink, a darker more plummy pink, a peach and a pale pink.
 |
| sorry about the photo quality my camera is rubbish :( |
If you saw my last Makeup Haul! post then you'll know that I bought the Maybelline Eyestudio Lasting Drama Gel Eyeliner 24 Hour in Black, it took me a couple of weeks to try this product as quite frankly I was scared to use it, I'm rubbish with liquid liner and I thought this was going to be something that would require tons of practise to get right but I couldn't have been more wrong! It's so easy to apply, the brush that comes with it is perfect for applying it and I absolutely love the way it looks!
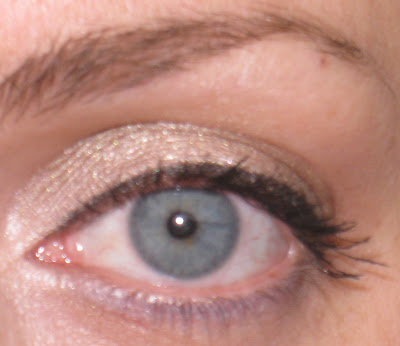 |
| It's much blacker than it shows up in the photo |
Last but not least is my Urban Decay Naked palette which I've used pretty much everyday since I got it. For a full review on this product click here. Everyone should own one of these!
I hope this post wasn't too long but I just had so many favourites this month I had to include them all. Has anyone else tried any of these products? What did you think about them? Leave me a comment :) xx
Silly Kids Craft - A-Craft-A-Day with Pattiewack for National Craft Month

I thought it would be fun to end the month on a silly note with these funny spoons I made into monsters! I love crafting with kids, and I know they will get a kick out of this fun craft. You probably have everything you need in your craft stash. But if you need the deets on how to make these, go to iLoveToCreate.com.
I hope you've had as much fun as me during National Craft Month, and that I sparked up a little creativity for you and your friends and family.
Happy Crafting!
Pattiewack
Craft on!
Friday, March 30, 2012
And the voting begins... Collection 2000 Easter Nails
Hi Lovelies, Voting is NOW OPEN on Collection 2000's Facebook Page for The Easter Nails Shortlist.
Please Please vote for My Easter Nails:

The Photo should Look like this & have My blog name: Ohh So Glam! & My Name: Sarah by them.
All You have to do is 'Like' & 'share' the Photo :)
Thanks Lovelies if You Vote
Lots of Love
Sarah xo
- Posted using BlogPress from my iPhone
Please Please vote for My Easter Nails:

The Photo should Look like this & have My blog name: Ohh So Glam! & My Name: Sarah by them.
All You have to do is 'Like' & 'share' the Photo :)
Thanks Lovelies if You Vote
Lots of Love
Sarah xo
- Posted using BlogPress from my iPhone
Somebody That I Used to Know
I've adored the sunshine the past few days. It's been so heavenly to wake up with the sun shining and not having to layer up before going out! I can't believe it actually reached 21 degrees on Wednesday!
So, I decided to crack out another little dress I picked up from Primark last weekend. I saw this on Hev's blog and just thought it was the cutest thing! So lightweight and dainty and the crochet top is very pretty. So glad I picked it up and it was sssuuuccchh a bargain for £6! I wore it with my new leggings from Select. I haven't had a pair of leggings in a while, and I forgot how good the feeling of a new pair was! Heaven! I just threw on an old scarf from Primark and these tan suede moccasins that I got from New Look last summer. They super comfy, and even though they make my feet look flat I really adore their vintage look. If they get anymore in this summer, I definitely recommend!
Now currently boohooing over the fact the sun has gone away today, so will probably try and film another youtube video this weekend. Any requests? Thank you!
One last thing, remember my Easter themed nails? Well it's been short listed for Collection 2000's Easter Nail Art comp, so I'd really appreciate if you guys could 'like' and 'share' my entry to vote for me! Thank you so much!
Monogram Bag - with Pattiewack for National Craft Month!

I simply love this bag, and when I designed it, I was tickled to death with the color. Of course I had to have a "W" on it, but you can put any letter and any font you want on yours by just printing it off your computer. And then grab your favorite die cutting system and cut out tons of felt flowers for the bottom. The instructions are on iLoveToCreate.com and more project ideas are there too.
Visit us on Facebook!
Craft on!
St. Tropez Gradual Tan Review
Hi Lovelies, Sorry I haven't done much 'Blogging' this week, it's been very busy to the lead up to My Birthday which is Tomorrow :)
Last Friday I tried out a sample of Xen Tan but not having any left I thought I'd maintain it with My St. Tropez Gradual Tan in Medium-Dark.

St. Tropez has been My all-time favourite Tan but now I'm loving the Xen Tan too.
About St. Tropez Gradual Tan
This enriched, nourishing body moisturiser cleverly combines serious skin care benefits with a healthy touch of bronze. Infused with soothing aloe vera, this lotion will help give you smoother, skin while building a gradual golden tan, every day.
My Review
So I applied this Last Night before bed, just like You would any other Moisturiser, Then made sure I gave My hands a good scrub after as You dont want orange palms!
Don't be fooled By this St. Tropez Tan thinking it's only a gradual Tan because I think it's alot darker than Your average gradual Tanner.
So When I woke up This Morning My skin was A lovely golden colour & streak free.
But compaired to the Xen Tan, You could tell it was fake tan as it's more of a Golden bronze colour rather than like then Xen Tan a more Olive Natural tone colour.
The smell is not as nice as the Xen Tan either, Xen Tan has a gorgeous vanilla smell when the St. Tropez has that fake tan biscuit smell.
I do Love St. Tropez but Xen Tan has took over its first Place Position.
I rate this Tan 8.5/10, Its great but after trying Xen Tan it isn't as great as that.
What is Your Favourite Fake Tanning Product?
Thanks for Reading Lovelies, Have a Fab Day.
Sarah xx
P.S The voting opens on the Collection 2000 Facebook Page for The Easter Nails some time today, Please Like & Share My Nails <3

Thanks Again, Sarah xo
- Posted using BlogPress from my iPhone
Last Friday I tried out a sample of Xen Tan but not having any left I thought I'd maintain it with My St. Tropez Gradual Tan in Medium-Dark.

St. Tropez has been My all-time favourite Tan but now I'm loving the Xen Tan too.
About St. Tropez Gradual Tan
This enriched, nourishing body moisturiser cleverly combines serious skin care benefits with a healthy touch of bronze. Infused with soothing aloe vera, this lotion will help give you smoother, skin while building a gradual golden tan, every day.
My Review
So I applied this Last Night before bed, just like You would any other Moisturiser, Then made sure I gave My hands a good scrub after as You dont want orange palms!
Don't be fooled By this St. Tropez Tan thinking it's only a gradual Tan because I think it's alot darker than Your average gradual Tanner.
So When I woke up This Morning My skin was A lovely golden colour & streak free.
But compaired to the Xen Tan, You could tell it was fake tan as it's more of a Golden bronze colour rather than like then Xen Tan a more Olive Natural tone colour.
The smell is not as nice as the Xen Tan either, Xen Tan has a gorgeous vanilla smell when the St. Tropez has that fake tan biscuit smell.
I do Love St. Tropez but Xen Tan has took over its first Place Position.
I rate this Tan 8.5/10, Its great but after trying Xen Tan it isn't as great as that.
What is Your Favourite Fake Tanning Product?
Thanks for Reading Lovelies, Have a Fab Day.
Sarah xx
P.S The voting opens on the Collection 2000 Facebook Page for The Easter Nails some time today, Please Like & Share My Nails <3

Thanks Again, Sarah xo
- Posted using BlogPress from my iPhone
Thursday, March 29, 2012
Toddler Easter Basket
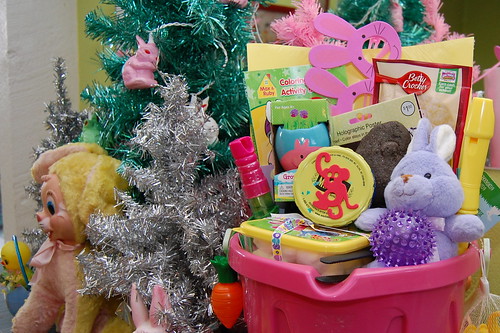

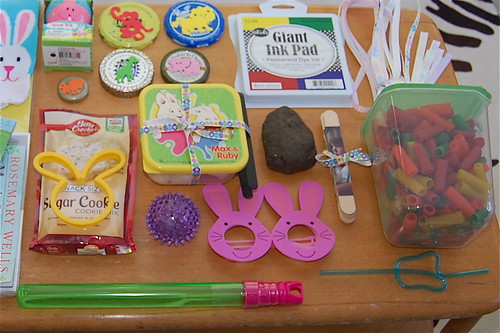
Easter is a mere 2 Sundays away, do you have your kid's Easter basket filled? Sure I've hit the dollar spot at Target to load up like all the other mother's, but I also made a slew of activities to include in the basket. My goal for this year's Easter basket was to not load up on cheap toys and junk that I would throw away in a week, but to look for items that would get used, played with and educate. I was inspired by a Creative Play Easter Basket I saw on Modern Parents Messy Kids and ran with the theme. Today for I Love to Create I am going to show you my own version of a toddler Easter basket. Next Thursday I will have the baby version.
First up I used a sand pail instead of a basket. I have a friend who every Easter gives her kids a sand pail filled with a new swimsuit, beach towel, float toy - you get the drift. I thought I would steal the bucket part. I must confess I also broke down and got a smaller basket from Target for Tallulah to use at the 3 egg hunts we have coming up in the next week. I should also mention no cheap Easter grass around these parts.
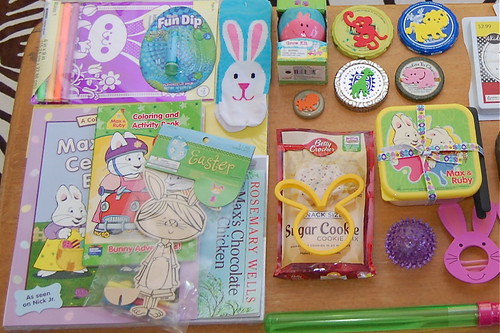
Not everything in my toddler Easter basket is homemade. Here is a quick list of the readymade items...
Coloring Book (Max and Ruby themed, they are bunnies after all)
Construction Paper (crafts, crafts and more crafts)
Glue (toddlers love glue)
Max and Ruby Book (her fave show)
Bubbles (big bubbles in wand form)
Grow Kit (mini garden in an egg shaped planter)
Lip Gloss (every toddler needs lipgloss)
Train Tracks (Thomas needs to feel the wind in his hair)
Curly Straw (kick milk up a notch)
Easter Socks (I can never find a pair so I keep buying more)
Recorder (more instruments for her pretend rock band)
Ball (it lights up!)
Stuffed Bunny (she loves a snuggly stuffed animal)
Cookie Cutters (for playdoh)
Cookie Mix (she loves to bake)
Various Craft Kits (at $.99 a pop, who can say no)
Bunny Glasses (futures so bright, I gotta wear bunny shades)
Ok, onto the stuff I did make!
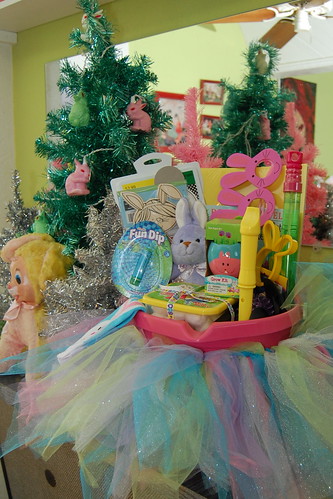
First up, the obvious is the Easter colors tutu. Tallulah is going through a ballet phase and often wants to listen to classical music and dance. I love to encourage a little dramatic play. I made a Halloween no sew tutu a few years ago with a full blogged tutorial.

To go along with the dance theme I also made some ribbon rings. I have seen these all over Pinterest and thought they would be fun for Tallulah.
SUPPLIES
Wooden Rings
Ribbon
Crafty Chica White Paint
Paint Brush
Liquid Fusion Glue

These were super easy. First I removed the small screws that came in my wooden rings. You could also use the metal rings from Mason Jars or shower rings. Next I painted my rings white. After the paint dried I attached some festive Easter ribbons. I used a little Liquid Fusion Glue to hold my ribbon in place. Let the maypole dancing begin.
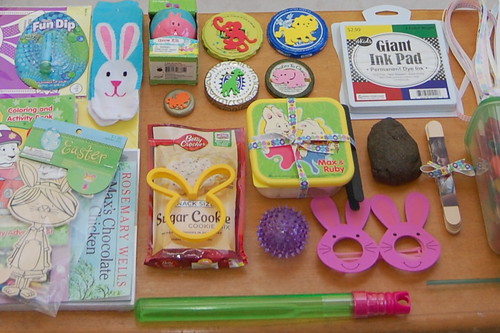
I finally found a way to recycle all those old lids I had been saving. Using foam stickers I made them into stamps. I also bought an extra large stamp pad to put in the basket.
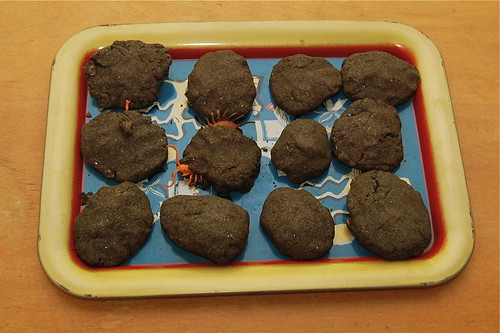
Tallulah loves dirt and dinosaurs so a batch of dinosaur eggs were in order. I used a recipe from Projects for Preschoolers.

I have long dreamed of making a popsicle stick puzzle since I first started seeing them floating around on Pinterest. I probably originally saw the idea in Halloween theme from Saltwater Kids. I used a photograph from Easter last year to make my puzzle.
SUPPLIES
Craft Sticks
Aleene's Tacky Double-Stick Sheets
Craft Knife
Masking Tape
Photograph
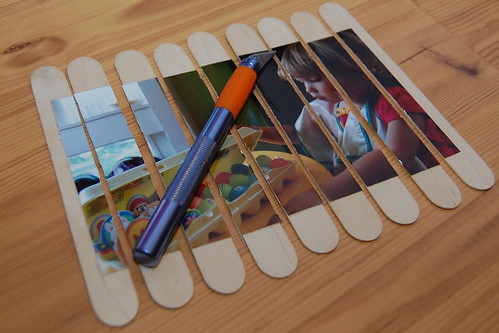
The first thing you need to do is line up enough craft sticks so that you can fit your photograph on top of them. Line your sticks up super straight and add a little tape to keep them together. Flip the sticks over. Add a sheet of Aleene's Tacky Sticker Sheets to the back of your photo. I had to use 1.5 sheets for mine. Center your photo over the sticks and press. Flip your sticks back over tape side up and using a craft knife cut the sticks apart. Remove the excess tape off the back, tie in a bow and stick in your Easter Basket.
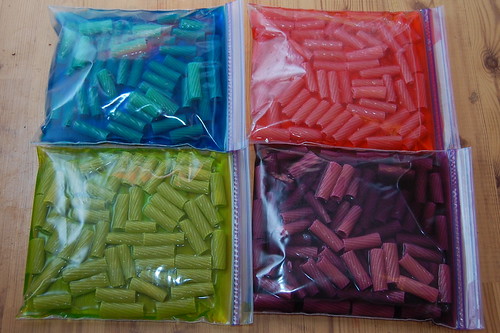
Yet another project I found on Pinterest is dyed pasta. Most folks seem to fill sensory bins with it, but Tallulah like her mother, loves to make jewelry. We have been on a kick of making straw necklaces around here and I thought we would upgrade from white straws to colorful rigatoni. All you have to do is place uncooked noodles, food coloring and rubbing alcohol in a baggie for a few hours. I put them in a tupperware container with some yarn for threading.

I went a little crazy at Target when they had Max and Ruby stuff in the dollar aisle. It is Tallulah's favorite show therefor making it also Baxter's favorite show since he has no choice. Anyway I was glad I loaded up on the little pieces of tupperware. This cute little container is filled with cotton balls and wrapped up with a set of small tongs. I'm going to tell her it is a game called 'bunny tails' where she picks up the bunny tails with the tongs and moves them to another container. Fun and practices motor skills and hand eye coordination.
So there you have it. My husband will say I went overkill as he always does (and most times he is right). However, I think this is a wonderfully entertaining candy-less basket to behold. What are some things you are putting in your toddlers Easter basket? I still have another week and a little bit of room left.
Remember to stop back by next week when I show you the baby Easter basket I am making for Baxter!
Looking for other suggestions of handmade toddler gifts that would go great in an Easter basket? How about playdoh, lacing cards, bubbles, soap, wash rag puppet, crayon cupcakes, rubbing plates - check out the kids section for more suggestions.
***This is a sponsored post by I Love to Create - I was compensated & given free supplies. Mama has gotta pay the bills somehow and really who in their right mind would say no to free craft supplies***
Visit us on Facebook!
Craft on!
DIY Screenprinting Video with the NEW Tulip ScreenIt!
This quick screenprinting tutorial was so much fun to tape at the 2012 CHA Tradeshow in January. It was shot by the folks at When Creativity Knocks, and is one of the 'manufacturer must haves' at the trade show. It's actually an introduction to this really amazing new machine that we are happy to announce.
I'm serious when I say that it's super easy to do screenprinting with this fabulous ScreenIt machine, and I will be using one of these at home and at iLoveToCreate for cool t-shirts, totes, home decor, and more! You'll need to check back later for the date on when it will be available on our website, and some really fun projects, so be on the look out for it!
Visit us on Facebook!
Craft on!
Nature Collection - A-Craft-A-Day with Pattiewack for National Craft Month!

One of the things I like about a nature walk, is picking up the things that interest me and I want to examine more closely. But then what to do with them? Kids are the same way, and this idea is great since it's a recycled pizza box, a sheet of paper, some post-it labels, and your finds. There's more ideas on iLoveToCreate.com and tons of kids crafts. See you again tomorrow, and the rest of this month for National Craft Month!
Visit us on Facebook!
Craft on!
Wednesday, March 28, 2012
Tutu Dress-up - National Craft Month with Pattiewack

Little girls love wearing tutus, don't they? And this little dress-up outfit is too-too fun! I did a graffiti shirt, hair band, and over-the knee socks with vibrant colors, with a little attitude. You can find all the instructions and supplies on iLoveToCreate.com and pick the colors your tutu wearing girlie girl will love.
Visit us on Facebook!
Craft on!
Pastel Candyfloss
So, this actually was very simple, but kind of an accidental discovery...kind of. I used these rounded manicure guides from ebay (no. 3), as I was intending on painting half moon shapes on the base of each of the nails alternating colours. However, the tape just ripped off the nail varnish -_- GRR!
So, I started again. I applied the rounded nail guides at the base of each nail, trying to maintain a similar size oval on each nail. I then I painted my nails, leaving the beds of the nails beneath of the stickers bare. I alternated with my two newest editions to my nail polish collection: Collection 2000 Hot Looks in Candy Floss and Button Moon. I love these both SO much, they're are just the epitome of pastels, so perfect for Spring!
I painted a couple of coats, then waited for the nails to dry and peeled off the stickers. And that's it! Very simple, and created a beautiful clean and pretty look for Spring now that the sunshine is out! Ahhh :)
iLoveToCreate Teen Crafts: Spring Flowers Felt Make-up Bag
Visit us on Facebook!
Craft on!
Avalon Potter for iLoveToCreate Teen Crafts
Spring Flowers Felt Make-Up Bag
"Teen crafted, mom approved."
Avalon has a small collection of make-up all mixed up in a cluttered drawer, so this was a perfect way for her to get it all organized. This project was all her idea, I just helped with some advice and am posting the instructions! It is so easy to turn a few pieces of craft store felt and some ribbon into a delightful decorative pouch using Aleene's Tacky Glue. You can style this however you choose, I love the chocolate brown with the pops of orange and fuchsia Avalon selected.
Materials
Brown Craft Felt
Hot Pink Craft Felt
Fuchsia Craft Felt
Genevieve Gail Boho Felt Flowers (1 die cut orange and one solid yellow)
3/8" Fuchsia grosgrain ribbon (Offray)
5/8" Medium rick rack orange (Simplicity)
1 Tulip Glam-it-up blue metallic crystal
Aleene's Super Thick Tacky Glue
Layered flower die
6 grommets
Tools
Die Cutter (I used a Sizzix Big Shot)
Grommet setting tool (I used a Crop-a-dile)
Scissors
The body of the bag is a full piece of brown felt folded in the middle. The bottom flowers are pre-cut, use die cutter to cut the layered top flowers. Glue and stack flowers.
Add grommets to sides and center of pouch on both sides using grommet setter. Glue edges of pouch together, add flowers and rick rack ribbon trim with glue. Attach crystal to center of flower with glue. Place something inside of pouch and on top of flowers to prevent glue seepage and lay under a large book and allow glue to dry.
Add ribbons. Tie ribbons through grommets at both sides, you can secure this with a dab of glue and optionally add Aleene's Stop Fraying to ribbon ends. Tie a knot in a 6" segment of ribbon and thread into grommet in center, repeat for opposite side. This will allow you to tie pouch closed.
Enjoy!
Subscribe to:
Posts (Atom)


