Saturday, December 31, 2011

Favourite Products of 2011

So, as another year comes to an end, I thought what better way to sum it up than my favourite products of 2011. These are the products that I have been reaching for endlessly for the best part of the year and have never let me down. You may have read me mention some of these before, but it's just because they are products I know and trust and 100% recommend. Excuse some of the photos, these products are worked to the bone so some of them are not in the finest of condition. Hope you enjoy, and happy new year everyone.


I'm a picky one when it comes to what products I put on my skin. I have the strangest skin type, which can never really make its mind up, and through the winter it is simply a pain in the ass! But there are some tried and tested products that have made a regular appearance in my make up routine this year. My two favourite pressed powders are Collection 2000's Pressed Powder in Candlelight and MUA's Pressed Powder in Shade 1. I like to use two powders to set my foundation and build up the coverage, and I have discovered this combination works fantastically for me. However, I could rave about MUA's powder all day; it's the best value powder I have ever brought. So thick, with so much colour in it and it lasts all day, and all for £1. Definitely my find of the year.

Collection 2000's Perfect Finish Foundation in Ivory has been my favourite foundation of '11. I'm a creature of habit, and when I change foundation (and I like it) I tend to stick to it for quite a while. This has been my go to all year. It has a good medium coverage, which can be built up easily and a pleasing price tag. Its constancy is creamy and thick-ish, but not heavy in any such way, so very easy to apply to your skin and not drying at all.

When doing my cheeks, I like to build up the look, normally starting with a bronzer and then applying a blush over the top on the apples of my cheeks. MUA's Blush is Shade 4 is a fantastic deep pinky red. It is very pigmented so you only need a little colour on your brush. I love this colour for both day and evening as I feel it suits my skin tone well, but MUA offer a lovely range of shades all for £1 each so it's easy to test out and discover which shade suits you best. 

I've recently got into filling my eye brows in. It was never something I'd do before as I have quite dark brows, but I like the defined look as I think it really finishes your make up off. I simply colour in the inner corners of my brows with 17's Eyebrow Shaper until they look fuller and more shapely, then use the brush to soften and spread into the middle of my brow.

My favourite concealer of the year is 17's Hide and Chic in the shade light beige. It has a creamy consistency and it feels like you get a lot of product in the tube. Its brush tip is useful for application, although I like to blend it in with my finger afterwards. It has reasonable coverage, but I especially like it for evening out my skin tone underneath my eyes after apply my foundation.
My lips are a tough mistress to please, they don't get a long with many products in all honesty. I'm getting there though, it just takes patience to find what works. Nivea's Essential Care has been a real life saver for me. For years I have been a salve to good old vaseline, but to be honest, I don't think it actually does anything for my lips. I just kept apply religiously and getting no where. However, Nivea really seems to smooth and soothe my lips, and now I really swear by it. My favourite lipstick of the year is by far Maybelline's Colour Sensational in the shade Wined and Dined. I wrote a full review on it a couple weeks a go. I just love the colour so so much and think it's an amazing product.


Eye make up, the best part of doing your make up in my opinion! This year, I discovered the MUA Eye Make Up Palettes, and I think I must of mentioned them a thousand times by now. Read my reviews here and here. They're great value for money palettes and I really enjoy creating looks with them. My favourite mascara continues to be The Body Shop's Big and Curvy, mentioned in my All Time Favourites Post. Love its thin brush, making it so much easier to reach and cover all my lashes as well as its thick, waxy, black constancy. I just can't find anything that beats this mascara, it's the best one I ever discovered.

Collection 2000's Glam Crystals is a lot of fun. I have it in two shades, Funk (gold) and Glitz (silver) and both gel eye liners offer a lot of colour in just one stroke. It looks great when you've built the colour up by allowing it to dry then going back over. It really is so dazzling and eye catching, especially when you line it right the way round your eye. Just be careful not to go too close to your actual eye ball, as my eyes have streamed glittery tears quite a few times, and its painful!

The knackered old eye shadow above is Collection 2000's Intense Solo Eye Shadow in the shade Frosting. I go on about this shadow a lot, and believe me I use it every time I create any eye shadow look. Teamed with a bit of eye primer, this colour used around the inner corners of your eyes really sets your make up off and gives your eyes such a wide eyed look. I love the colour and it starts off any smokey eye perfectly. 

I haven't changed my favourite eye liner since I was about 16. It's always been Collection 2000's Kohl Pencil in black. The above is the current one I am using called Intense Colour. Collection 2000's Kohl pencil's are the best, I always get compliments on my eye liner and it's all down to this little baby. I rarely use liquid eye liner, as I find the definition I get from this pencil unbeatable. My secret is to simply keep it nice and sharp when drawing a winged line. 


I go through a million different nail varnishes a year, but this year I think its fair to say everyone's been obsessing over glitter varnishes, and I am no exception. Enter Barry M's Limited Edition Nail Paint. You get SO much glitter in this top coat varnish, and its so strong so your nails rarely chip when you have a couple of coats on. I just love it, its the best glitter nail varnish I've had and makes it so easy to make any old varnish glitzy! 

I was so happy when I discovered Sally Hansen's Nail Art Pen. This pen is so much fun and really just a fantastic product. I can't fault it, it does exactly what it says on the tin! I have a full review of the pen here.


2011 has been quite a year for me, full of my usual highs and lows. I'll keep powering through as I always do! I really appreciate the really supportive feedback I've been receiving from my friends and peers as well as my followers. Looking forward to blogging in 2012, I've got lots of ideas planned to share with my readers, so here's to hoping things will only get better!

Happy New Year, wishing you a prosperous 2012.

Friday, December 30, 2011

Cool2Craft TV for January 2, 2012: EcoHeidi EcoHome

Cool2Craft TV for January 2, 2012: EcoHeidi EcoHome - Join host Heidi Borchers for a new episode of EcoHeidi TV on the Cool2Craft TV Network. This week's show theme is EcoHome. Today's featured projects are: Vintage Aleene Fabric and Wire Flowers, Soda Can Fish Sculpture, Glue Art Canvases by Candace Jedrowicz, and a Water Bottle Room Divider. It's a terrifically tacky and creatively cool show! It’s easy to watch the Cool2Craft TV Channel right from your computer. Airing Monday January 2, 2012 9am Pacific/10am Mountain/ 11 am Central/ Noon Eastern. Go to http://cool2craft.com and find the Livestream player and chat box. See you Monday!

Visit us on Facebook!
Craft on!

Thursday, December 29, 2011

Glitter Makes Everything Better


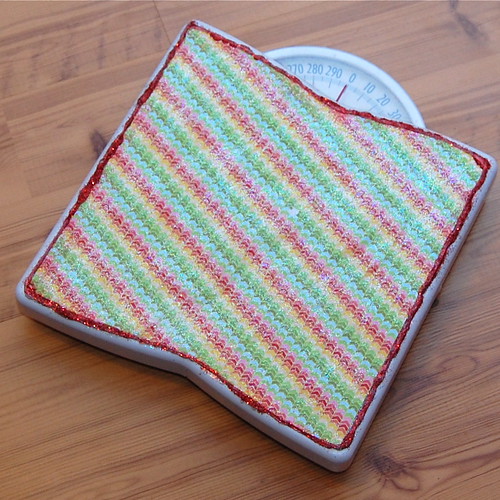
Every January most of us make the same resolution - to lose a little weight. For me, losing the baby weight is on the top of my list. I thought if my scale and I are going to be spending a lot more time together in the near future I might as well make it a little easier on the eyes.


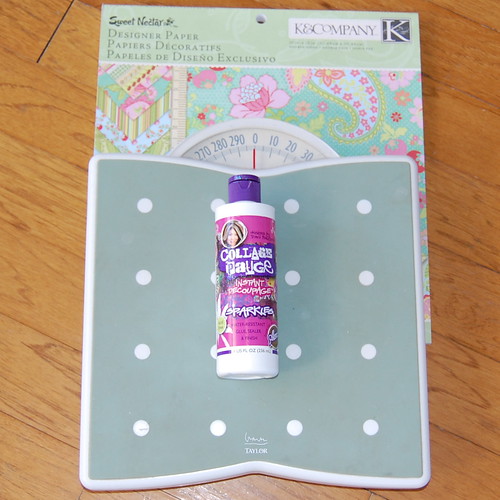
SUPPLIES
Scale
Scrapbook Paper
Collage Pauge
Fast Grab Tacky Glue
Crafty Chica Glitter
Paper Glaze
Scissors

After you choose a decorative paper that tickles your fancy cut it out to the size of your scale. Using Collage Pauge adhere your paper to your scale.


Next trim the paper in Fast Grab Tacky Glue. While the glue was still wet sprinkle red glitter. You might want to try and get your lines a little straighter than I did. Allow the whole thing to dry completely.

When everything is dry give the scale a top coat or two of paper glaze.


Every week when I weigh in to try and reach my goal I'll get to look at bright colors and glitter. Sparkles make everything better, even my weight.


Visit us on Facebook!
Craft on!

How to make Glittered Heart Crayons with the Crafty Chica

Crayons are a childhood staple, and many times they end up broken mess all over the house. The Crafty Chica shows us how to get more life out of your crayons with this fun and easy video tutorial using silicone cupcake/candy molds! And of course, she adds her signature touch of glitter using her very own Crafty Chica® Glitters. The kids will love drawing with their their crayon and glitter creations!


Visit us on Facebook!
Craft on!

Pin It

Wednesday, December 28, 2011

How to make Felt Rosettes - a video tutorial


These little felt rosettes are so simple and easy to make and they are absolutely darling for your décor and cute hair accessories. Pattiewack shows you how to make them in this quick video tutorial!!!


Visit us on Facebook!
Craft on!
Pin It

iLoveToCreate Teen Crafts: New Year's Necklace by Avalon Potter

Visit us on Facebook!
Craft on!
New Year's Necklace Copyright 2011 Avalon Potter

New Year's Necklace
Avalon Potter for iLoveToCreate Teen Crafts
"Teen crafted, mom approved."

My mom has been working a new video tutorial using black and white scrapbook papers. I loved her project and wanted to do a variation. Since it's almost New Year's, I added lots of sparkles so it would feel just like the day itself. This project is very easy to make and when you are done you will have something that you can wear on New Years or any day of the year!


Materials
Double sided black and white toile scrapbook paper
Large jump ring
Mini-ribbon bow tie
Aleene's Tacky Line Roll
Tulip Dimensional Fabric Paint glitter in gold
Tulip Fashion glitter in light gold jewel
Gold chain

Tools
Scissors
Ruler
Bone folder


Instructions

1.Take your black and white paper and cut out a piece that is 2.5"x6.5".

2.Take the piece and start to fold back and forth on the long side making each fold about a .5" wide. use a bone folder to make strong creases.

3.Once you have folded the whole piece fold the ends together from the center point making a fan.

4.Where the fan edges meet adhere Tacky Line Roll all the way down then pinch the middle pieces together.

5.Next put a thin line of Dimensional gold glitter on the folds and on the bottom. Then shake more gold glitter on top of that, tap off excess and allow to dry.

6.On the top attach a little white bow using Tacky Line Roll.

7. Take a large jump ring and string it through the top where the fan meets.

8. Slide a chain through the jump ring. You now have a fun and festive New Year's necklace!

Tuesday, December 27, 2011

VIDEO: Crafty Chica Empowerment Guardian Tutorial by Fahtz

This is Fahtz with glittered nails, a handmade bracelet and an art tiara - all of which she made at the Phoenix Craft Rave earlier this month!

This adorable little girl named Fahtz came out to our Phoenix Craft Rave last month and stayed for hours crafting! iLovetoCreate was one of our sponsors - which meant everyone got a FREE Crafty Chica Empowerment Guardian in their swag bag.
 Here is a video of Fahtz decorating her guardian - it is soooo cute, it will surely make you smile! And she certainly has the Crafty Chica spirit - from adding lots of glitter to cheetah print trim! Right on!

LINK

Visit us on Facebook!
Craft on!

MAYA IN THE MOMENT CRAFT: New Year's Eve Sparkly Mittens

 Here is a bonus craft that I wanted to share before New Year's Eve - Sparkly Mittens! This is for you ladies who plan to wear some glitz on your fancy night out - maybe to the movies, or a party or a street festival. Why not glam  up your gloves too? It's super easy!
 You'll need some gloves - I bought a package of two at Target, they were on clearance! Next you'll need:
a Tulip® Cordless Heat Setting Tool™
Tulip® Glam-It-Up!™ Iron-On Crystals™ 
Tulip® Glam-It-Up!™ Fashion Art Tweezers™ 

You'll also need something to slip your gloves over while you add the crystals - like a soup can. This is so that the crystals won't come off when you stretch the gloves to insert your hands. You want to glue the crystals on while the gloves are stretched.
 
 You'll want to pick up the crystals one-by-one with the tweezers, set in place and then use the heat tool to apply them.


 For the white gloves I used Tulip® Glam-It-Up!™ Iron-On Studs! 
 Like what you see, come visit me on my blog - MayaintheMoment.com. You can also like me on Facebook or subscribe to my videos on YouTube!

Visit us on Facebook!
Craft on!

Sunday, December 25, 2011

Merry Christmas!


Merry Christmas everyone!

I've spent the whole day in my Christmas onesie, win!

Friday, December 23, 2011

Cool2Craft TV for December 26, 2011: Best of 2011


Cool2Craft TV for December 26, 2011: Best of 2011

Join host Tiffany Windsor for a new episode of Cool2Craft TV. This week's show theme is Best of 2011. Tiffany creates a Wax Resist Art Canvas, EcoHeidi Borchers crafts a Water Bottle Felt Bracelet featuring Aleene's Original Tacky Glue and special guest Candace Jedrowicz crafts a Kitschy Pedestal. It's a terrifically tacky and creatively cool show!

It’s easy to watch the Cool2Craft TV Channel right from your computer. Airing Monday December 26, 2011 9am Pacific/10am Mountain/ 11 am Central/ Noon Eastern. Go to http://cool2craft.com and find the Livestream player and chat box. See you Monday!

Visit us on Facebook!
Craft on!

Maybelline Colour Sensational


This is my new favourite lipstick, it's the one I mentioned in my vignette and beauty tag post previously. It's Maybelline's Colour Sensational, in the shade Wined and Dined. I love this lipstick, for a number of reasons, but for some reason they don't sell this shade in the UK, the closest it looks like they've got is the shade Fatal Red. But if you want Wined and Dined, like me you can get it off eBay for a fraction of the price!

I think this colour is perfect for this time of year, such a warm, deep red for these cold winter nights! I feel like I'm channelling my inner Khloe Kardashian here, and I'm loving it! I went for a darker red, as it's normally said that darker shades of red suit darker skin tones like my own. I wore this lipstick when I went out for lunch with my friends yesterday, might of been a bit much for the day but who cares, it's Christmas! The colour lasted all day, from when I put it on at 12 o'clock til about 6 in the evening. In this time I'd been eating, drinking and even patted it off a couple times with tissue, and the colour remained. 

The lipstick itself is very soft on my often dry lips. It smells very lightly like play dough, which I don't mind as the smell doesn't transfer onto your lips. It's not drying in the slightest, which I tend to have a problem with when it comes to wearing lipsticks, hence why I often avoid doing so. It didn't crack and stayed smooth all day, which I'm really pleased about.

I'll definitely be buying more from the Maybelline Colour Sensation range, I just think it's fantastic and I'm so pleased to have finally found a brand that suits my lips. 

Thursday, December 22, 2011

Seasonal Sensory Bottles


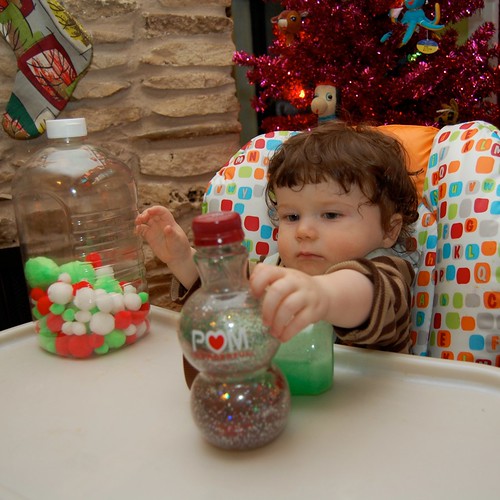
Last week when I did my series on handmade stocking stuffers I realized most of them were for toddlers. What about the babies? They need some handmade love too right? Don't worry I whipped up something fun and festive for Baxter too. Sensory bottles!


SUPPLIES
Empty Plastic Containers
Tacky Glue
Crafty Chica Glitter
Various small Toys


I had been saving clear plastic jars for awhile waiting for just the right craft moment. Seasonal sensory bottles were the perfect use for them.

Fill your bottles with various items. I put red, white and green pom poms in one. Another had oil, water and glitter. The third was full of red, silver and green glitter.


Once your jars are full add some tacky glue to attach the lids. We don't want baby swallowing any pom poms.

When the glue is dried completely park baby in front of the Christmas tree and watch him twirl and twist his new toys with delight. Not just for babies. These sensory bottles were also a big hit with the toddler set.


Visit us on Facebook!
Craft on!

M is for Marie


Adore this dress from Lavish Alice! The first time I'd ever looked on the site I brought it straight away! Couldn't resist a bit of animal print, especially if it's a skater dress. Love the belt that comes with it as well. I'm really into tan leather at the moment and I like it against the animal print of the dress, plus a belt to nip you in at the waist is always a good look to give your figure more definition. I think its only £20 plus packaging, so with prices like that you can't really argue!

My rings were a Christmas present from my lovely friend Alice. She's making loads of jewellery and selling bits to raise money for her final project. I also brought a cute button ring from her, which I tweeted about. I love my scrabble ring so much, I've wanted one for ages! Head over to their facebook page here for details!

Wednesday, December 21, 2011

MAYA IN THE MOMENT CRAFT: Candy Cane Heart Picture Ornament

 My mom and I experimented with MELTING candy canes this week and had all kinds of yummy results. Here is the idea I made!

Did you know you can melt the candy canes into hearts by putting them in the oven for a few minutes?

Here is what you need:
You'll also need:

 - cookie sheet
- parchment paper
- oven
- oven mitt

Preheat the oven to 300F.
Line the cookie sheet with parchment paper. Remove plastic wrapper from each candy cane and set them as hearts on the cookie sheet. Let them heat up for three minutes. always use caution when using the oven, I suggest kids have an adult around to help them.

Remove the tray from the oven. Press the ends together so they set and the joints are secure. Use a steak knife to trim away excess candy cane. You want to have clean edges so it looks nice! Let cool.

 Cut up the Tacky Sticker Sheets into strips and apply to the back of the candy cane - don't forget to add string to hang your ornament!

Set the candy cane on top of the picture. Cut away excess.

 This is what I ended  up with, but I thought they looked BLAH. They needed some sparkle power. I found some glittered cardstock and cut out hearts. I added more Tacky Sticker Sheet adhesive and pressed them to the back of the ornament. Much better!


As a way to say Merry Christmas (and Happy Hanukkah too!), I'm sharing a little song I sang! It's Christmas Waltz and I hope it makes you smile. Have a wonderful, magical, glitter-filled holiday! Click below to watch, I hope you like it!


Visit us on Facebook!
Craft on!