Wednesday, November 30, 2011

Studded Shoe DIY by Guest Blogger Kristen Turner


Editors note: We are so excited to have Kristen Turner of Glitter 'N Glue as an iLoveToCreate guest blogger.  If you don't know Kristen already, we suggest you get in the know!  As an L.A. stylist by day, and a fashion blogger by night, she's making waves in the fashion blogosphere with easy DIYs on a dime.  She has recently been featured on NBC's Today Show and has also showcased DIY projects on E! News. You can also find her in feature on top fashion sites like Refinery29, MyStyle, and Broke Girl's Guide. She's definitely one to watch!

I know for some of my reader the leaves are changing, the air is getting colder or maybe you’ve already had your first snow. Well, here in LA we’re now only reaching a daily high of about 60 -65 which means it’s officially winter. Ok I’m exaggerating a little but it is time for me to put away the sandals and pull out the flats. Which reminds me, my current wardrobe is lacking in the flats department because last season I ruined my favorite pair.

Louboutin’s Candy studded flat.
This was actually the first pair of Loubous that I ever bought. I ate noodles for weeks to pay for them. I’ll spare you guys the gruesome picture of my flats in their current state, but just so you know there’s a whole in the bottom of one of the shoes. And I’ve already had them resoled twice :-(.

Dum dum dum dummmm…Beads In A Bottle to the rescue! At last years Craft And Hobby Association Conference I stopped by the I Love To Create booth and was introduced to the Tulip’s Beads In A Bottle! (For those of you who don’t know, CHA is a convention where craft bands unveil their latest and greatest products for the new year. It’s serious business.)  A few months later they finally hit the shelves at Michael’s and I scooped up one in every color. I’ve been holding on to them all year, until now…

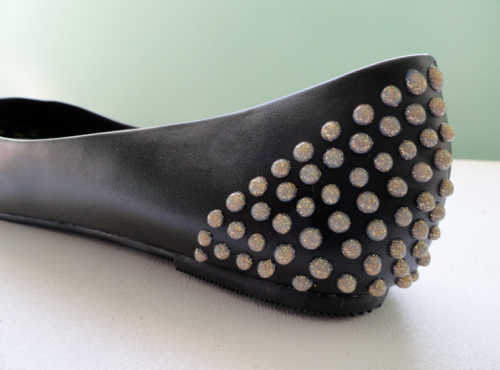
The Beads In A Bottle are amazing because after they dry they look like studs. Have you guys ever added studs to an article of clothing? I break out in a sweat! #TooMuchWork

I was trying to recreate the look of my precious Louboutin’s…

but ended up completely covered the toe and the heel of my flats with beads for an undated variation.

I’m so excited about my new “studded” flats!


Visit us on Facebook!

Craft on!

Tuesday, November 29, 2011

Rainy Day Wish List 29.11.11


If you couldn't tell already, it was raining today, a lot. Plus, it's been one of those headache inducing days at uni, so I was feeling inspired to search for the most comforting and cosy clothes that I'm after for this December.

001. This covers two of my most favourite things right now, the colour black and blouses. Okay, maybe black has always been a fond shade of mine, but this blouse is just gorgeous. I love the little stud detailing, giving it a glamorous, rocker look. I'm also a huge fan recently of the whole, buttoning your shirt up to the collar look. Plus, when can you ever go wrong with the slimming power of the colour black?

002. OH MA GEE how cute is this animal hood? I love love my fur this A/W and am always a fan of anything cute and cuddly! I already have an leopard print faux fur trapper hat from H&M with little ears, but then again how can you ever have enough hats with little ears on?

003. Well, this coat has been on my wish list for many months now. I promised myself I'd buy it in September when it first came up on the Miss Selfridge website, but I'm yet to justify spending £80 on a coat when I already have quite a few... I'm a huge fan of b i g hoods, and well this one is pretty damn big. I'm thinking maybe I should just bite the bullet? Wait, I have no money :(

004. Love this tan scarf, it's just so simple and to the point. I've given up on huge knitted scarves for the time being as I always seem to get covered in wool (and eat it by accident too, it doesn't taste good). I feel it has a sophisticated look to it, and could be very versatile depending on what outfit you added it to.  

005. Just look at that barbie pink beauty. What more do I really need to say? Spotted this in H&M in Birmingham last week and to be honest I've been thinking about it ever since!! I had to put it on straight away, I just thought it was the most adorably divine thing ever! I just don't know what the hell it would go with!

006. Finally, the pom pom hat. I already have a creamy, floppy kind of one, but I just love the chunky knitted nature of this hat. I can just imagine my head feeling very cosy!

Monday, November 28, 2011

Tresemme Salon Professional Ceramic Styler 230


Here are my Tresemme hair straighteners, which I've had for just under a month now and I can happily say they are fantastic.

I brought these straighteners when my previous pair completely cut out on me out of the blue after only a year (by which time I came to realise the guarantee had expired! Terrible!). Terrified as to what I was going to do without my most important hair appliance, I searched Amazon desperately in search of a replacement pair. Usually, if you want a decent set of ceramic hair straighteners, you're looking at paying £70 up really. So, when I came across the Tresemme Salon Professional Ceramic Styler 230 I was pretty convinced they were too good to be true. All the reviews were brilliant, saying that the appliance met, if not exceeded, the high standards of the infamous GHDs. Well, for a measly £20, saving £40 on it's RRP, how could I say no? (Plus, the guarantee was 5 years, much better!)

When I received the straighteners I was pleasantly surprised to see they came with a heat proof travel pouch, which is always useful to have. I immediately plugged the straighteners in and switched them onto their highest setting (an impressive 230 degrees), waited for them to heat up (which takes less that 15 seconds!!) and got stuck into my hair. The 1 inch ceramic plates straighten like a dream, sliding through my hair much more smoothly than my previous, much more expensive hair straighteners.

It's probably important to note that I have quite thick hair, which has always been curly and prone to frizzing. And if a pair of straighteners can tackle that then you know they're a good'un!

Tresemme Salon Professional Ceramic Styler 230 have a very smooth, rounded shell which makes creating curls so easy. I've found with previous, more square, plastic shelled straighteners that when you try and curl your tresses, the curls come out quite square and tight. Where as with these Tresemme straighteners they glide through your hair, helping me create some lovely wavy looks. Plus, the 3 metre swivel cord means you can reach right around your head with ease.

An added bonus for me is the auto shut off feature. A bit of a must for me as I've come home a few times to find my flat overwhelmingly smelt of burning after leaving my straighteners on whilst leaving in a hurry! So I've been pretty lucky to not have burnt the whole block down as of yet!

Overall, I've never been so pleasantly surprised by a hair appliance before, and I 100% recommend these to anyone. It really does do the job to a fantastic standard. 


Sunday, November 27, 2011

eBay Jewellery Finds


Here are a few bits I found on ebay over the past couple weeks. I'm a big fan of searching through jewellery on ebay, as I always seem to find a bargain or two. One of my favourite ebay jewellery sellers is Skorbee, from Hong Kong. Their jewellery does take a while to arrive, but it does has a long way to travel. However, the items are definitely worth the wait. 

My lovely bronze elephant necklace and bronze bow ring were beautifully sent from Skorbee. The packaging was adorable, it was literally like receiving a present in the post (apart from the fact I paid for it myself!) The products are good quality, just as good maybe even better than what you'd find on the UK high street along with an impressive price tag to match. £4.29 for the necklace and £3.16 for the bow ring are prices you just can't argue with! Plus, I receive so many compliments on my elephant pendant, he really is an eye catcher!


Here's also my double finger cross ring, which are pretty popular at the moment which I got from another seller on ebay. I love this ring. It's adjustable so you a fit it over any fingers, but I always wear mine over my middle and ring finger. It goes with so many outfits, definitely my new favourite. 

My All Time Favourites


001. The Body Shop's Big and Curvy Mascara is by far the best mascara I've ever had. I originally got it as a sample from Body Shop and was so blown away that I brought a new bottle straight away as a back up. I do like my mascara's thick and dark, giving me a heavy look to define my eyes, and with a few coats this is what big and curvy delivers. I've been though a lot of mascara's in my 21 years, but I think I have found my faithful companion in this mascara. Proving that big and curvy, is beautiful!

002. My two must use hair products, both of which I came across completely by accident. Firstly, Morrison's Heat Protection Spray. I was out of heat defence, so picked up the cheapest bottle I could find on my weekly food shop. I'm sure it cost £2 or less. This spray for starters, smells AMAZING! No exaggeration, it's like pure mangos or something. It doesn't leave your hair feeling stiff or make it greasy easily like I've found with previous heat defence sprays, and it's defiantly done the job when it comes to protecting my hair from daily blow drying, straightening and curling.
Secondly, Boot's Coconut & Almond Leave-in Conditioner for normal to dry hair. I am always after the latest product to keep my hair soft and healthy, as I tend to avoid the hairdresser quite often and, as I mentioned before it's important that I defend my hair from the daily wear and tear of styling. Now, I can honestly say, this is the best leave-in conditioner I've ever used. Not normally one to use leave-in conditioners as I normally find they make my hair greasy, I picked this one up as part of a 3 for 2 promotion when I was in need of a third item. I gave it a go that night and haven't looked back since. Spraying it from my mids to ends liberally when my hair is still damp, this spray kept my hair soft against the holiday elements of the sun and salty sea. It also has seen me through the change of seasons, as my hair normally starts to dry out as we move from summer to winter.

003. Urban Decay's Naked Eye Palette is by far my favourite eye make up palette I've ever owned. I think it's fair to say this palette is loved by many cosmetics lovers, and I am definitely one of them. I'm a huge fan of eye make up, it's my favourite part of doing my make up. Naked offers an amazing set of neutral and nude shades along with some sparkly smokey colours, giving your look depth. The colour pay off for all the colours is amazing, the shades, especially the darker colours are so pigmented and I never experience any fall out. Although this palette may be slightly on the pricey side, I think it's definitely an investment worth making. And word on the street is that Urban Decay are releasing Naked 2! OH the excitement!

004. Last, but by no means least, my favourite make up product of all time, 17's Shine Control Pressed Powder. I've been using this powder since I first started wearing make up. I'm lucky enough that they've continued to sell this powder for the last 7 years, but I suppose it goes to show I'm not this only one who depends on this product! Shine control is a major concern for a lot of girls. I have quite oily skin, admittedly not as oily as it was when I was younger but it's still an on going issue. However, my shine is beautifully concealed by 17's Shine Control. After I've applied my foundation and concealer, I apply the powder over my whole face. It has great coverage, covering blemishes well and give a flatteringly smooth finish. I don't think I'll ever be without this powder. And as long as they keep selling it, I'll keep buying it! 

Friday, November 25, 2011

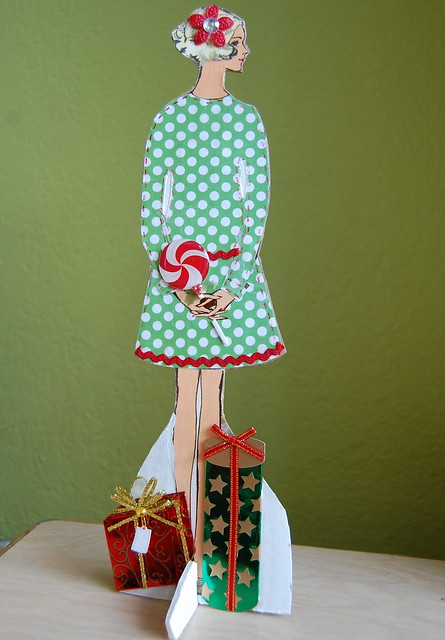
Christmas Cutie Pattern Stand Up Doll


Ya, ya, ya I know I did a project using my vintage pattern girls just a few weeks ago. So sue me. She was fall themed, had a fabric dress and was in a frame. This new and improved Christmas cutie has a fresh spin on the same illustrations and it is the perfect project to kick off all the Christmas crafting you have planned.


SUPPLIES
Vintage Sewing Pattern Image
Scissors
Aleene's Quick Dry Glue
Rick Rack
Scrapbooking Paper
Foam Board
Chip Board
Collage Pauge
Tracing Paper
Pencil
Red Pen
Jolee's Scrapbooking Elements
Crafty Chica Paint White
Craft Knife
Paint Brush

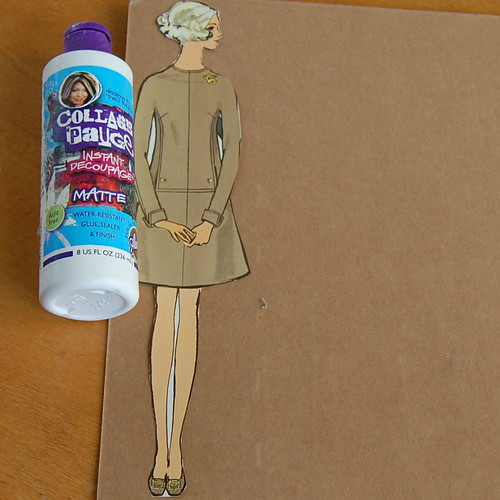
Let me start by saying just because you don't have a vintage pattern book does not mean you can not play along. Pick up a vintage sewing pattern at the thrift store to use for the graphic. Choose a full length picture of a model from a magazine. Better yet have a friend take a picture of you to print out and use!

Once you have your desired image to make into a wee little stand up cut her out. Place your image on a piece of foam board, cardboard or chipboard and decoupage. I used a combination.


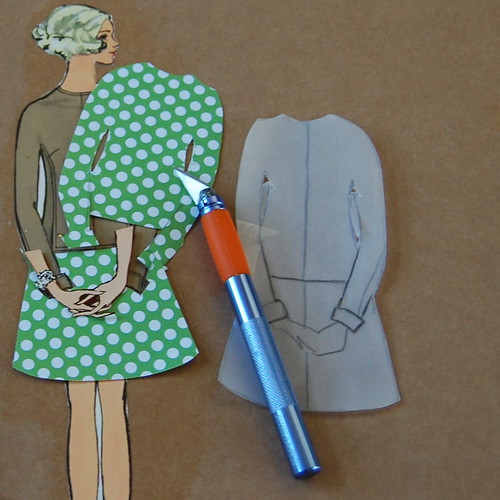
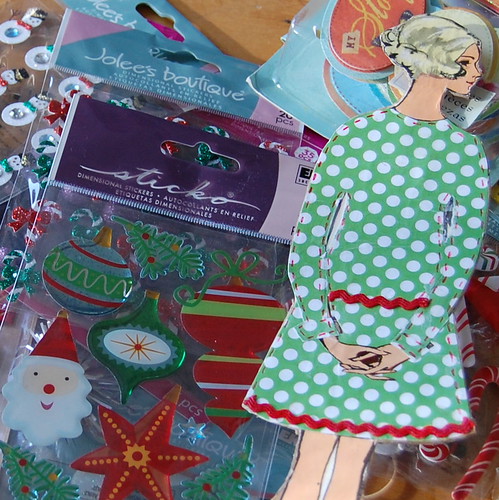
At some point either before or after you cut out your image trace the dress. This will give you a pattern to work with. I suggest using a fairly simple design. Also, a lesson I learned the hard way is you should cut out the hands to glue on separate. I'll explain in a minute.


After you have your pattern made from tracing paper you can place it on scrapbook paper or thin fabric to make a new and improved dress. Use a craft knife to cut out the detailed spots like between the arms and body. This is where I should have cut out her hands completely before I decoupaged her to chipboard. No worries, I just stole hands from another image. This way you don't have to do all the tedious knife work around the hands you can just stick them on top of the new outfit.


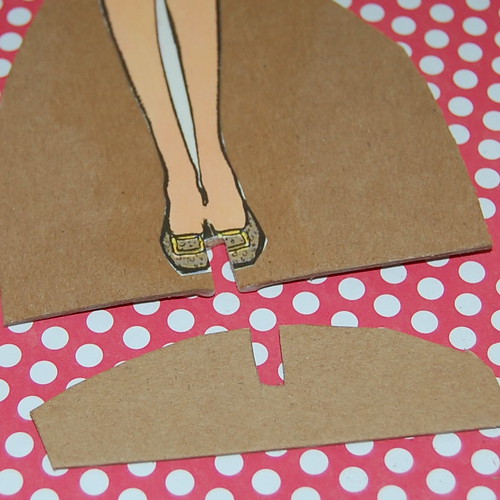
The next step after getting your dress decoupaged in place is cutting out your stand up. Leave a wide base at the bottom. This picture lies a little bit. I did cut a slit in the center, but I used a small piece of foam board instead of chipboard as the second part of the base. The foam board is thicker and helps her stand better.


Now for the fun part! Using various vintage bits and pieces, scrapbooking elements, pens and sewing notions you can gussy up your stand up. I used Aleene's Fast Dry Tacky Glue to hold everything in place.


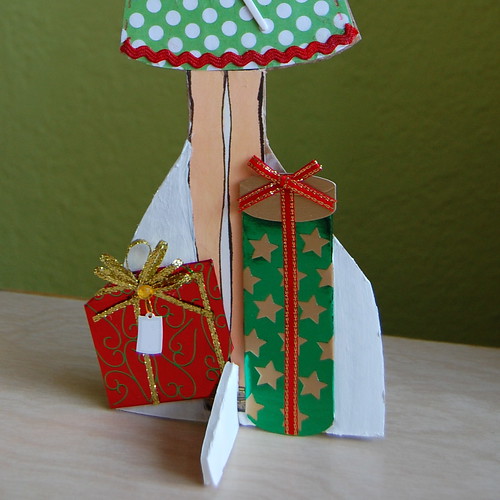
I finished things up by painting the backside and base white with Crafty Chica paint. I used a few wrapped gifts around the base to make things extra festive.


Set your Christmas Cutie anywhere to add an extra touch of kitschy cheer. I can't wait to make a whole slew of these lovely ladies. I also see a shelf sitter version in my future! Love to know if you make your own version.


Visit us on Facebook!
Craft on!

Cool2Craft TV for Monday November 28, 2011


Cool2Craft TV for November 28, 2011: Gifts from the Heart

Join host Tiffany Windsor for a new episode of Cool2Craft TV. This week's show theme is Gifts from the Heart. Tiffany creates a textured glue heart frame with Aleene's Original Tacky Glue in the Gold Bottle, EcoHeidi Borchers designs watercolor gift tags with Tulip's Beads in a Bottle and special guest Candace Jedrowicz is crafting teddy bead gift wrap.  It's a terrifically tacky and creatively cool show!

It’s easy to watch the Cool2Craft TV Channel right from your computer. Airing Monday November 28, 2011 9am Pacific/10am Mountain/ 11 am Central/ Noon Eastern. Go to http://cool2craft.com and find the Livestream player and chat box. See you Monday!

Visit us on Facebook!
Craft on!

Wednesday, November 23, 2011

iLoveToCreate Teen Crafts: Technicolor Turkey Card

Visit us on Facebook!
Craft on!
Technicolor Turkey Card Copyright 2011 Avalon Potter for iLoveToCreate

iLoveToCreate Teen Crafts
Technicolor Turkey Card
Copyright Avalon Potter

I needed to make a thank you card for my Mom Mom and with Thanksgiving coming up, a Turkey seemed like a great idea!  My mom helped with the pattern and I picked out the papers, embellishments and colors and put it all together.  It's really simple to make a card like this, one big circle, one oval, rounded and pointed feathers, a funky hat, half circles for wings and bird feet are all stacked together using Aleene's Dry Adhesives.  We added a few 3D embellishments for fun. It's easy to make this project your own with a few changes, have fun with it!


Materials
Coordinated patterned scrapbook papers
Cardstock in light and dark pink and light and darker green
3D embellishments (googly eyes, spoon and fork charms, paillette and Tulip Beads in a Bottle Studs and Crystals)
Aleene's Tacky Sticker Sheets
Aleene's Tacky Dot Roll
Aleene's Tacky Line Roll

Tools
Scissors
Paper cutter
Bone folder
1.5" circle punch

1. Fold an 8.5x11" sheet of dark pink cardstock in half and crease edge with a bone folder. This is the base card.

2. Use circle punch to create light pink card stock turkey head.

3. Fold any paper in half and cut oval body shape, trace this on light pink card stock and cut out.

4. Cut feet out of darker green card stock.

5. Cut hat shape out of patterned paper and make a hat band out of light green card stock.

6. Cut the feathers, there are rounded and pointy feathers, the round go on top and the pointy in between them. Cut beak and wings out of light green card stock and gobbler out of patterned paper. Cut a bib out of patterned paper to fit center of body.

7. Attach the beak and gobbler on face using sticker sheet. Add googly eyes with Tacky Dots. Attach hat to top of head adding hat band with sticker sheet and add embellishments with tacky dots.

8. Attach the bib to the front of the turkey using sticker sheet. Attach wings on either side of bird followed by the head at the top with sticker sheet.

8. Attach feet with sticker sheet. Use Tacky Line Roll to attach silverware.

9. Build feathers around the back of the card using the sticker sheet to attach. Layer the pointy feathers in between the rounded. Attach the turkey to the base card using the sticker sheet.

Monday, November 21, 2011

Retrofabulous Christmas Craftabration: Upcycled Holiday Cards

Visit us on Facebook!
Craft on!
Retrofabulous Upcycled Holiday Cards Copyright 2011 Margot Potter for iLoveToCreate

Christmas Helps 1966-Family Circle
From Christmas Helps 1966-Family Circle

From Christmas Helps 1966-Family Circle
iLoveToCreate Retrofabulous Crafts
Upcycled Holiday Cards
Copyright 2011 Margot Potter 

Today's Retrofabulous Christmas Craft is a simply delightful upcycled card project.  In the original project from Christmas Helps 1966-Family Circle they used tissue paper, but I love using recycled magazine images in my work.  Can you guess what the images are on the Christmas balls and candles?  The trees use some old scrapbook paper scraps and text from a magazine.  You could easily cut up last year's Christmas cards, wrapping paper, ad flyers...it's truly endless!  Aleene's new paper friendly glues make quick work of these cards.  Have you seen how expensive cards are?!  This saves money and gives a personalized touch to your holiday greetings. 


Materials
Cardstock in holiday colors
Recycled magazines
Aleene's Tacky Sticker Sheets
Aleene's Tacky Line Roll
Aleene's Tacky Dot Roll
Tulip Glam-it-up Crystals
Paillettes
Wired tinsel
Fine marker

Tools
Bone folder
Scissors
Paper cutter
Circle punches in graduated sizes

1. Select papers for card. Cut card to size on paper cutter. Fold paper in half and use bone folder to make a sharp edge on card.

2. Cut images into shapes (I used graduated circle punches to make the Christmas balls.)

3. Adhere large images to card using Aleene's sticker sheets.

4. Use Aleene's Tacky Line Roll for wired tinsel and Aleene's Tacky Dot Roll for small embellishments.  I used a fine tip marker to draw the thread on the Christmas balls.

Upcycled Holiday Card Detail

Upcycled Holiday Cards Detail

Friday, November 18, 2011

Cool2Craft TV for Monday November 21, 2011


Cool2Craft TV for November 21, 2011: EcoHeidi Green Bling

Join host Heidi Borchers for a new episode of EcoHeidi TV on the Cool2Craft Channel. This week's show theme is Green Bling. EcoHeidi is creating a super cool bangle bracelet from brown grocery bag handles and Aleene's Original Tacky Glue in the Gold Bottle, a bright and fun buttons bracelet from a clear water bottle and a bigger than big pendant from a drink bottle bottom (yep! nothing goes to waste!). Special guest Candace Jedrowicz is crafting blue bling dangle earrings.  It's a terrifically tacky and creatively cool show!

It’s easy to watch the Cool2Craft TV Channel right from your computer. Airing Monday November 21, 2011 9am Pacific/10am Mountain/ 11 am Central/ Noon Eastern. Go to http://cool2craft.com and find the Livestream player and chat box. See you Monday!

Visit us on Facebook!
Craft on!